

NodeMcu ESP8266 WIFI Internet Development Board with Cable COM46 ,R11
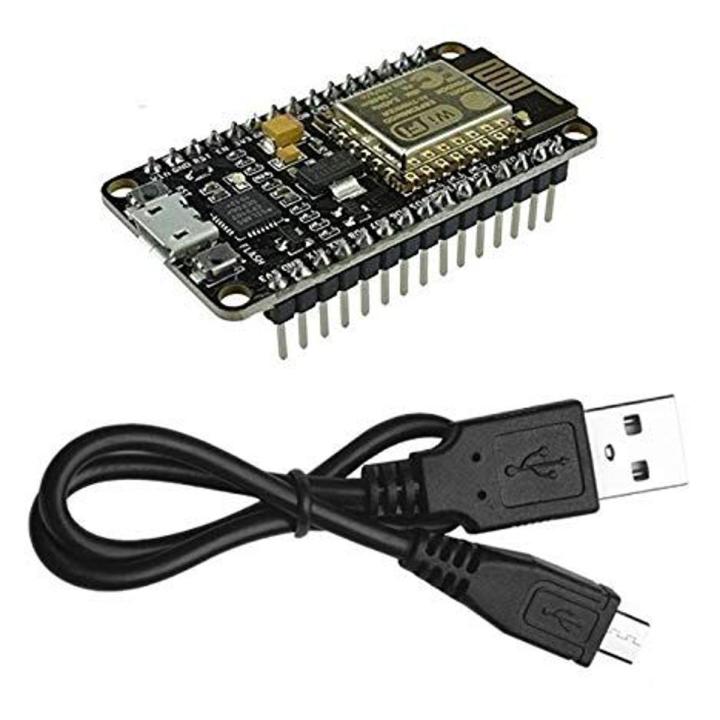
DescriptionIf you want a frustration-free coding experience, choose the NodeMCU ESP8266 CP2102. While many boards look identical, the chip near the USB port makes a huge difference. This model uses the premium CP2102 USB-to-UART bridge from Silicon Labs. This means you rarely need to hunt for drivers—Windows and Mac computers usually recognize it instantly.Breadboard Friendly DesignMakers prefer this “Amica” version for its size. It features a narrower PCB width compared to the CH340 “Lolin” models.More Room to Wire: When you plug this into a standard white breadboard, it leaves one row of tie-points accessible on each side. This allows you to use jumper wires easily without running cables underneath the board.Powerful ESP8266 CoreDespite the smaller footprint, it packs the same power. The ESP-12E module provides 802.11b/g/n Wi-Fi, 4MB of flash memory, and 80MHz of processing speed. You can program it easily using the Arduino IDE or MicroPython.Why Choose CP2102?High Speed: Supports higher baud rates for uploading code faster.Stability: Less prone to connection drops during serial monitoring.FeaturesUse CH340G repalce the CP2102.Open-source, Interactive, Programmable, Low cost, Simple, Smart, WI-FI enabled.Arduino-like hardware IOAdvanced API for hardware IO, which can dramatically reduce the redundant work for configuring and manipulating hardware.Code like arduino, but interactively in Lua script.Nodejs style network APIGreatly speed up your IOT application developing process.Wi-Fi MCU ESP8266 integrated and easy to prototyping development kit.ApplicationIt provide the best platform for IOT application developmentEvent-driven API for network applicaitons,which faciliates developers writing code running on a 5mm*5mm sized MCU in Nodejs style.HOW TO GET STARTED WITH NodeMcu ESP8266NodeMcu ESP8266 requires 3.3V power supply that can be obtained from some phone battery charger which you plug into it either into a power jack or connect it to your computer through a USB port. The I/O pins of ESP8266 communicate or input/output max 3.3V only. i.e. the pins are NOT 5V tolerant inputs. Please don’t supply it with 5V from arduino or any power source.The pin mapping of NodeMCU are different from those of ESP8266 GPIOs . Remember you will only need Arduino IDE installed on a computer to start using this module. Arduino IDE doesn’t come with the necessary libraries and drivers so that you can use the NodeMcu ESP8266 module. hence we need to download and install libraries in Arduino IDE so that we can have fun with our NodeMcu module. Then at this level you need to open your arduino IDE and perform the following task to get the required libraries and drivers:go to files -> Preferences or CTRL Comma Copy and paste the following link into the blackbox next to Additional Board manager.http://arduino.esp8266.com/stable/package_esp8266com_index.jsonclick OKclose and restart your arduinogo to tools -> board manager and search for ESP8266 and install the libraries/filesclose and restart afterselext NodeMCU board by going: Tools -> Boards(scroll down the list of boards) -> NodeMcu 1.0(ESP-12E Module)select also the right Port number for the module. The rest of settings can be left to default valuesas we finished installing libraries into Arduino IDE. We must also install drivers for our board to function properly, here is the links : for CP210x and CH340GLet’s start using our board by:Blinking the LED by NodeMcu ESP8266 We will connect external LED directly to GPIO16 or D0 (as marked on module) there is no need of an external current limiting resistor.go to File -> examples-> ESP8266->blinkNote: in case, if Arduino IDE version 1.6.7 fails to work for you, try to go back to arduino 1.6.5 or update to arduino 1.8.1.Connecting NodeMcu ESP8266 to a WiFi network and Blink LED_BUILTINThis program will connect your NodeMcu ESP8266 to a WIFI network and print its IP address on your Arduino serial monitor you need to modify your SSID and password#include <ESP8266WiFi.h> const char* ssid = "YOUR_WIFI NAME"; //your WiFi Name const char* password = "YOUR_WIFI PASSWORD"; //your WiFi password void setup() { pinMode(LED_BUILTIN,OUTPUT); Serial.begin(115200); delay(10); // We start by connecting to a WiFi network Serial.println(); Serial.println(); Serial.print("Connecting to "); Serial.println(ssid); WiFi.begin(ssid, password); while (WiFi.status() != WL_CONNECTED) { delay(500); Serial.print("."); } Serial.println(""); Serial.println("WiFi connected"); Serial.println("IP address: "); Serial.println(WiFi.localIP()); } void loop() { digitalWrite(LED_BUILTIN,HIGH); delay(1000); digitalWrite(LED_BUILTIN,LOW); delay(1000); }Upgrade your toolset with the reliable NodeMCU ESP8266 CP2102 from Faranux Electronics.DocumentCH340G driversCP210x USB to UART Bridge VCP DriversPackage includes: 1×NodeMcu ESP8266 CP2102 WIFI Internet Development Board
Share on: